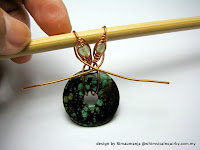
The making of - Donut & Bone

Step 1, measure and cut wire approximate 8 inches and fold it in half.

Step 2, 

Step 3, 

Step 4,


Step 5,


Step 6, make two herringbones on each wire


Step 7,


Step 8,


Step 9,


TA DAAAA! :))


OK people, this is just a brief idea on how i get something like "JAIMIE'S COIN".


Did you notice the absolutely GORGEOUS turquoise stone? OMG...i found some recently that i dont know which to use to craft items for sale and which to keep for myself!

The design above actually looked more dramatic on the coin. On the turquoise above..look so so only...so will make some modification soon. 

Anyway, thought of sharing something simple that i know some crafters out there already know the herringbone method that i been teaching...so this is just some of the ideas you can adopt and apply to your own design.

HAPPY CRAFTING! :)

M


I hope you enjoyed this free tutorial. 
If you need to ask questions and  need further help with the handmade jewelry making tutorial, please email me at:

If you enjoy and find this tutorial helpful, DO share this FREE tutorial and link it back to this blog.

you can use this jewelry making tutorial to produce finished products for your own pleasure or for individual sale.

You are encourage to apply the techniques learned from this jewellery making tutorial to come up with your own creative works .

Please respect all intellectual property of WHIMSICALNQUIRKY handmade jewellery. PLEASE do not remove, amend or photoshop anything and use it for your personal gain while not giving credit to the author of this tutorial.
All cooperation is much appreciated.


Copyrights 2010 @Rimaumanja,whimsicalnquirky.com.my


CHARLOTTE'S WEB PENDANT TUTORIAL


this tutorial is now available.

Price: RM20 
(PDF file)

Price: RM30 
(printed copy, inclusive of shipping and handling)

For rest of world:
Paypal price: USD8
To purchase please go to JEWELRYLESSONS.COM


Tutorial: Charlotte’s Web Pendant


Created by Rimaumanja
www.whimsicalnquirky.com.my

The first original idea of Charlotte’s Web pendant is with a different bead wire weaving technique. I decided to combine the charlotte’s web color scheme and pendant bail design with Deep Purple Necklace’s bead wire weaving technique.

 This tutorial will teach you Deep Purple’s wire weaving with bead technique and open Viking knit technique.
 Also included is how to make the pendant bail.

Through my experience of conducting group craft sessions, the most common problem among crafters is how not to get your wires tangled which always results in loads of bends and kinks.
 I will show you in this tutorial how I ‘manage’ my wire that always works for me and wire bends and kinks are a thing of a past for me.
 It takes discipline, and it is not difficult at all…to me that is J

Please read thru the whole tutorial first before proceeding to craft it. It is very important that you understand the mechanics of making this pendant like materials required, tools needed and also simple basic discipline to avoid wire bends and kinks.

Materials:

· 18 gauge copper wire (approximate 12 inches)
· 24 gauge copper wire (approximate 120 inches, possibly more. Better to have more handy)
· 18 pieces 4mm round faceted milky pink glass crystals

Tools:

· Chain nose pliers
· Round nose pliers
· Wire cutters
· Flat nose pliers
· Ruler
· Wire filer
· Ring mandrel or similar
Pen or medium size knitting needles

Number of steps: 70
Number of pages: 32
PDF file size: 2.7MB


I hope you will enjoy this jewelry making tutorial. 
If you need to ask questions and  need further help with the handmade jewelry making tutorial, please email me at:

Please do not distribute, lend, copy or mass produce this handmade jewelry making tutorial for re-sale or for jewelry making workshops other than author’s own. 
Please respect all intellectual property of whimsicalnquirky handmade jewelry.

However you can use this jewelry making tutorial to produce finished products for your own pleasure or for individual sale.

You are encourage to apply the techniques learned from this jewelry making tutorial to come up with your own creative works .

Copyrights 2010 @Rimaumanja,whimsicalnquirky.com.my


FANTASY EARRINGS TUTORIAL


this tutorial is now available.

Price: RM20 (PDF file)
Price: RM30 (printed copy, inclusive of shipping and handling)

For rest of world 
PAYPAL price: USD8
to purchase please go to Jewelrylessons.com


Description:

This lesson shows how to make this sweet lovely pair of earrings by incorporating the open Viking knit technique, a  wire weaving technique with beads.


Material List:
  •  18 gauge copper  wire
  •  24 gauge copper  wire
  •  32 pieces of 4mm round faceted cut glass crystals

Tool List:
  •  Chain nose pliers
  •  Round nose pliers
  •  Wire cutters
  •  Flat nose pliers
  •  Ruler
  •  Wire filer


  • Number of steps: 35
  • Page count: 19
  • File size: 1.4MB
I hope you will enjoy this jewelry making tutorial. 
If you need to ask questions and  need further help with the handmade jewelry making tutorial, please email me at:

Please do not distribute, lend, copy or mass produce this handmade jewelry making tutorial for re-sale or for jewelry making workshops other than author’s own. 
Please respect all intellectual property of whimsicalnquirky handmade jewelry.

However you can use this jewelry making tutorial to produce finished products for your own pleasure or for individual sale.

You are encourage to apply the techniques learned from this jewelry making tutorial to come up with your own creative works .

Copyrights 2010 @Rimaumanja,whimsicalnquirky.com.my


CHARMING LIFE BRACELET TUTORIAL


PDF file format, Price: RM20
Hardcopy printed material, Price: RM30 inclusive of shipping and handling


For rest of world,
PAYPAL price: USD10
to purchase you can go to Jewelrylessons.com

Description:
This tutorial is to help you make a wire wrapped and weaved charm that will not only look great as a charm bracelet but as earrings, mobile charms or pendants.
In this tutorial there are several combined techniques: Herringbone wire wrap technique and Wire weaving technique
I am hoping that this tutorial will help you to be more creative and apply the techniques to create other artistic pieces of jewelries.
Material List:
  •  18 gauge copper silver plated wire
  •  24 gauge copper silver plated wire
  •  6 pieces of 14mm long x 10mm diameter of teardrop centre drilled stones
  •  5 to 6 pieces of oval 6mm or 8mm crystals
Tool List:
  •  Chain nose pliers
  •  Round nose pliers
  •  Wire cutters
  •  Flat nose pliers
  •  Ruler
  •  Wire filer
  • Number of steps: 59 File size: 1135.27 KB
Page count: 24


For REST OF WORLD you can go to JEWELRYLESSONS.COM


I hope you will enjoy this jewelry making tutorial. 
If you need to ask questions and  need further help with the handmade jewelry making tutorial, please email me at:

Please do not distribute, lend, copy or mass produce this handmade jewelry making tutorial for re-sale or for jewelry making workshops other than author’s own. 
Please respect all intellectual property of whimsicalnquirky handmade jewelry.

However you can use this jewelry making tutorial to produce finished products for your own pleasure or for individual sale.

You are encourage to apply the techniques learned from this jewelry making tutorial to come up with your own creative works .

Copyrights 2010 @Rimaumanja,whimsicalnquirky.com.my