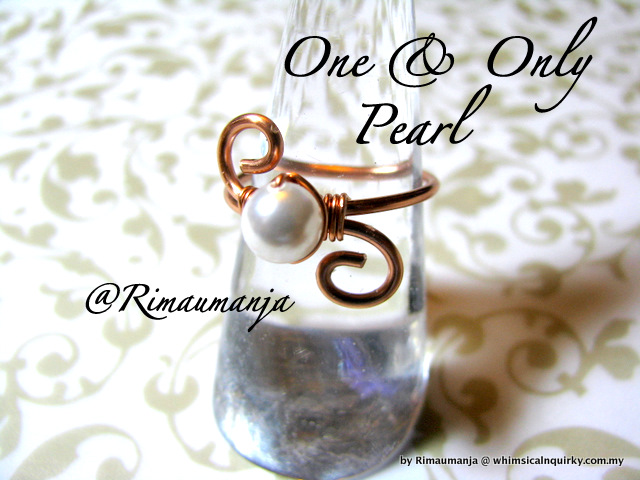
The making of - ONE & ONLY RING TUTORIAL


This is a very simple and yet lovely ring to wear. All you need is some wires ( not much), scraps are perfect and one single round 6mm bead. If you prefel larger size bead...you will probably need to use different wire gauges to suit that bead.

Materials i used for this free tutorial,
6mm swarovski pearl
16 gauge wire
24 gauge wire

Tools,
ring mandrel
cutter pliers
round nose pliers
flat nose pliers
chain nose pliers
ruler
wire filer

*******************************************

Begin directly from the spool. 
Measure and cut the desired ring size.
Leave about an inch on each end from the point where wires meet at the centre.


cut wire away from spool.
File sharp wire ends with wire filer.


If you have 24gauge wire scraps from past projects,this is the time to use them.
You will need about 6-7 inches in length.


make 5 wraps around ring frame as in picture.


thread in one pearl bead.


position pearl across ring on overlapping point.


wrap wire tail around ring frame as in picture.


Then wrap wire tail around pearl.


Repeat wrapping wire tail around pearl bead.
On the 3rd or 4th wrap, wire tail position is at the back.


Then wrap that wire tail around ring frame 4 or 5 times, your preference.


Cut any excess wire.


Final step is to curve in both wire ends of ring frame.


DONE!


I hope you enjoyed this free tutorial.
If you need to ask questions and  need further help with the handmade jewelry making tutorial, please email me at:

If you enjoy making this ring, DO share this FREE tutorial and link it back to this blog.

you can use this jewelry making tutorial to produce finished products for your own pleasure or for individual sale.

You are encourage to apply the techniques learned from this jewellery making tutorial to come up with your own creative works .

Please respect all intellectual property of WHIMSICALNQUIRKY handmade jewellery. PLEASE do not remove, amend or photoshop anything and use it for your personal gain while not giving credit to the author of this tutorial.
All cooperation is much appreciated.


Copyrights 2010 @Rimaumanja,whimsicalnquirky.com.my


My struggle to make the "trinket box" pendant, part 2

I finally finished both trinket pots but still not satisfied with the finish. still need more practice.
This is a very interesting project to undertake and if you are interested please go to the designer's site at,


do give it a try and please share the result with me!
Please email to me your finished projects and we can share and exchange ideas :)

These are the two trinket pots i did :))


My struggle to make the "trinket box" pendant

Recently i saw a really cute cute trinket box pendant at jewelrylessons.com and was disappointed that there is no tutorial available for it. 
So i struggled to make one and while i was doing it...what do you know....the designer herself send me an email with a link to her blog!...with details on how to make the trinket box thru a simple to understand tutorial. such a sweetheart!

i was so touched that somebody cared enough to help a nobody me....thank you to brassybeads of http://theangstyartist.blogspot.com/
Really appreciate it and i will definitely try to do better than the first trinket box pendant :)))

seriously inspired!


SPARKLING KNITTED COPPER BRACELET TUTORIAL


Tutorial: SPARKLING KNITTED COPPER BRACELET


design and craft by RIMAUMANJA
www.whimsicalnquirky.com.my


this tutorial is now available.

Price: RM20 
(PDF file)

Price: RM30 
(printed copy, inclusive of shipping and handling)

For rest of world, 
Paypal price: USD8

NOW AVAILABLE!! AT  JEWELRYLESSONS.COM


This is a very basic tutorial about knitting with wires. It is suitable for those who does not know how to knit and would like to learn how to knit a simple bracelet. There is no fancy knitting pattern in this tutorial just the basic KNIT, so do not be afraid thinking that it may be hard.

 If you face problems with this tutorial, please contact me ASAP via email to whimsicalnquirky@gmail.com and I will try my very best to assist you. 


Materials:

· One spool 26 gauge copper wire (for first timers, better practice with inexpensive copper wires)
· 15 inches of 16gauge or 18gauge copper wire
· 100 pieces of 4mm round faceted cut glass crystals.
· 2 pieces of cone shape bead caps

Tools:

· Chain nose pliers
· Round nose pliers
· Wire cutters
· Flat nose pliers
· No.12 knitting needles
· Wire filer
· Pen


  Ruler


Number of steps: 70
Number of pages: 38
PDF file size: 3.22MB


I hope you enjoyed this tutorial. 
If you need to ask questions and  need further help with the handmade jewelry making tutorial, please email me at:

Please do not distribute, lend, copy or mass produce this handmade jewelry making tutorial for re-sale or for jewelry making workshops other than author’s own. 
Please respect all intellectual property of whimsicalnquirky handmade jewelry.

However you can use this jewelry making tutorial to produce finished products for your own pleasure or for individual sale.

You are encourage to apply the techniques learned from this jewelry making tutorial to come up with your own creative works .

Copyrights 2010 @Rimaumanja,whimsicalnquirky.com.my


NEW tutorial coming up soon! :)

Do you know how to knit?
Would you like to learn how to knit with wire? :))

I am now working on a new tutorial applying knitting technique with wire. Casting wires on to the knitting needle is not as easy as casting yarn. So I have made several adjustments from the conventional way of casting on so that it is more practical when casting on with wire. It is  easier and less complicated... M's style k :)

The first and second step of writing the tutorial is done and now i am into the final stage :)


BABY DRAGONFLY PENDANT TUTORIAL

Tutorial: BABY DRAGONFLY


design and craft by RIMAUMANJA
www.whimsicalnquirky.com.my


this tutorial is now available.

Price: RM20 
(PDF file)

Price: RM30 
(printed copy, inclusive of shipping and handling)

For rest of world, 
Paypal price: USD8

This tutorial is also NOW available at JEWELRYLESSONS.COM

Dragonflies and butterflies are two of my favorites. The colors are beautiful and always give me the impression of something magical and ethereal.


In this tutorial, you will learn how to make the herringbone weave technique and apply this technique to create the dragonfly pendant.

You can choose to craft this pendant using the same size beads and wires  or to use your own bead and wire preferences.

Importantly, before you begin to craft out this project please read thru the whole tutorial. This will help you to get the rough idea first on how this dragonfly takes form.

Materials:

· 20 gauge round copper wire
· 24 gauge round copper wire
· 11 pieces 6mm faceted oblong rice shape Chinese glass crystal.

Tools:

· Chain nose pliers
· Round nose pliers
· Wire cutters
· Flat nose pliers
· Small pen
· Wire filer
· ruler


Number of steps: 56
Number of pages: 25
PDF file size: 2.1MB


I hope you will enjoy this tutorial. 
If you need to ask questions and  need further help with the handmade jewelry making tutorial, please email me at:

Please do not distribute, lend, copy or mass produce this handmade jewelry making tutorial for re-sale or for jewelry making workshops other than author’s own. 
Please respect all intellectual property of whimsicalnquirky handmade jewelry.

However you can use this jewelry making tutorial to produce finished products for your own pleasure or for individual sale.

You are encourage to apply the techniques learned from this jewelry making tutorial to come up with your own creative works .

Copyrights 2010 @Rimaumanja,whimsicalnquirky.com.my


The making of - Donut & Bone

Step 1, measure and cut wire approximate 8 inches and fold it in half.

Step 2, 

Step 3, 

Step 4,


Step 5,


Step 6, make two herringbones on each wire


Step 7,


Step 8,


Step 9,


TA DAAAA! :))


OK people, this is just a brief idea on how i get something like "JAIMIE'S COIN".


Did you notice the absolutely GORGEOUS turquoise stone? OMG...i found some recently that i dont know which to use to craft items for sale and which to keep for myself!

The design above actually looked more dramatic on the coin. On the turquoise above..look so so only...so will make some modification soon. 

Anyway, thought of sharing something simple that i know some crafters out there already know the herringbone method that i been teaching...so this is just some of the ideas you can adopt and apply to your own design.

HAPPY CRAFTING! :)

M


I hope you enjoyed this free tutorial. 
If you need to ask questions and  need further help with the handmade jewelry making tutorial, please email me at:

If you enjoy and find this tutorial helpful, DO share this FREE tutorial and link it back to this blog.

you can use this jewelry making tutorial to produce finished products for your own pleasure or for individual sale.

You are encourage to apply the techniques learned from this jewellery making tutorial to come up with your own creative works .

Please respect all intellectual property of WHIMSICALNQUIRKY handmade jewellery. PLEASE do not remove, amend or photoshop anything and use it for your personal gain while not giving credit to the author of this tutorial.
All cooperation is much appreciated.


Copyrights 2010 @Rimaumanja,whimsicalnquirky.com.my


CHARLOTTE'S WEB PENDANT TUTORIAL


this tutorial is now available.

Price: RM20 
(PDF file)

Price: RM30 
(printed copy, inclusive of shipping and handling)

For rest of world:
Paypal price: USD8
To purchase please go to JEWELRYLESSONS.COM


Tutorial: Charlotte’s Web Pendant


Created by Rimaumanja
www.whimsicalnquirky.com.my

The first original idea of Charlotte’s Web pendant is with a different bead wire weaving technique. I decided to combine the charlotte’s web color scheme and pendant bail design with Deep Purple Necklace’s bead wire weaving technique.

 This tutorial will teach you Deep Purple’s wire weaving with bead technique and open Viking knit technique.
 Also included is how to make the pendant bail.

Through my experience of conducting group craft sessions, the most common problem among crafters is how not to get your wires tangled which always results in loads of bends and kinks.
 I will show you in this tutorial how I ‘manage’ my wire that always works for me and wire bends and kinks are a thing of a past for me.
 It takes discipline, and it is not difficult at all…to me that is J

Please read thru the whole tutorial first before proceeding to craft it. It is very important that you understand the mechanics of making this pendant like materials required, tools needed and also simple basic discipline to avoid wire bends and kinks.

Materials:

· 18 gauge copper wire (approximate 12 inches)
· 24 gauge copper wire (approximate 120 inches, possibly more. Better to have more handy)
· 18 pieces 4mm round faceted milky pink glass crystals

Tools:

· Chain nose pliers
· Round nose pliers
· Wire cutters
· Flat nose pliers
· Ruler
· Wire filer
· Ring mandrel or similar
Pen or medium size knitting needles

Number of steps: 70
Number of pages: 32
PDF file size: 2.7MB


I hope you will enjoy this jewelry making tutorial. 
If you need to ask questions and  need further help with the handmade jewelry making tutorial, please email me at:

Please do not distribute, lend, copy or mass produce this handmade jewelry making tutorial for re-sale or for jewelry making workshops other than author’s own. 
Please respect all intellectual property of whimsicalnquirky handmade jewelry.

However you can use this jewelry making tutorial to produce finished products for your own pleasure or for individual sale.

You are encourage to apply the techniques learned from this jewelry making tutorial to come up with your own creative works .

Copyrights 2010 @Rimaumanja,whimsicalnquirky.com.my


FANTASY EARRINGS TUTORIAL


this tutorial is now available.

Price: RM20 (PDF file)
Price: RM30 (printed copy, inclusive of shipping and handling)

For rest of world 
PAYPAL price: USD8
to purchase please go to Jewelrylessons.com


Description:

This lesson shows how to make this sweet lovely pair of earrings by incorporating the open Viking knit technique, a  wire weaving technique with beads.


Material List:
  •  18 gauge copper  wire
  •  24 gauge copper  wire
  •  32 pieces of 4mm round faceted cut glass crystals

Tool List:
  •  Chain nose pliers
  •  Round nose pliers
  •  Wire cutters
  •  Flat nose pliers
  •  Ruler
  •  Wire filer


  • Number of steps: 35
  • Page count: 19
  • File size: 1.4MB
I hope you will enjoy this jewelry making tutorial. 
If you need to ask questions and  need further help with the handmade jewelry making tutorial, please email me at:

Please do not distribute, lend, copy or mass produce this handmade jewelry making tutorial for re-sale or for jewelry making workshops other than author’s own. 
Please respect all intellectual property of whimsicalnquirky handmade jewelry.

However you can use this jewelry making tutorial to produce finished products for your own pleasure or for individual sale.

You are encourage to apply the techniques learned from this jewelry making tutorial to come up with your own creative works .

Copyrights 2010 @Rimaumanja,whimsicalnquirky.com.my