Showing posts with label handmade jewelry tutorial. Show all posts

LITTLE CHARMS WIRE JEWELRY MAKING TUTORIAL


LITTLE CHARMS TUTORIAL

Tutorial: LITTLE CHARMSCreated by MASTURA MUSTAFFA

Level: Intermediate

This VERY DETAILED with images tutorial teaches you how to make little charms that you can use to make a pair of earrings, 
little charms for your bracelet or even little charm pendant.
The size taught in this tutorial is approximate 1 cm in size and you can use this as a guide 
to make bigger charms or pendants and adjust accordingly.
Techniques that you should know and not taught in this tutorial is how to make open spirals.

Materials:

  • 20gauge dead soft copper wire 
  • 26gauge dead soft copper wire
  • 2 pieces swarovski 8MM pearl beads


Tools:

  • A, nylon hammer
  • B, steel block
  • C, filer
  • D, chasing hammer
  • E, ruler
  • F, full flush cutter
  • G, chain nose pliers
  • H, round nose pliers
  • I, multi-mandrel (round shape) OR anything similar that is round about 1 cm in diameter. suggestion, ordinary writing pen that gives diameter of 1cm frame.


    PDF FILE SIZE:  2.4MB
    STEPS: 38 
    PAGES: 20

    price: RM20
    for LOCAL RESIDENTS OF MALAYSIA, DO email me if you are interested to purchase this tutorial.

    for INTERNATIONAL crafters PLEASE  click on link,

    copyright JUNE 2012 @ whimsicalnquirky.com

GLORIA RING WIRE JEWELRY MAKING TUTORIAL - NEW!


Description

Level: Intermediate
design and craft by RIMAUMANJA
*********************************

Tutorial: GLORIA RING
Created by RIMAUMANJA 
WWW.RIMAUMANJA.COM
WWW.WHIMSICALNQUIRKY.COM 

This lesson shows you how to make a glamourous chunky free style open spiral top ring with zig zag wire weaved shank. 

Crafters should already know how to make open spirals when starting on this project. 

Materials: 
18gauge dead soft copper wire
24gauge dead soft copper wire
 donut shape glass bead


Tools: 
Chain nose pliers
Round nose pliers
Wire cutters
Flat nose pliers
Ruler


PDF file content
****************
Number of steps: 21
Number of pages: 16
PDF file size: 3.2MB

Delivery 
********
1.Within 48hours upon paypal payment notification
2.In PDF file format

KERAWANG FIRUZ PENDANT TUTORIAL


I hesitated at first about making this tutorial because I myself find it difficult. 
Not one piece I made came out exactly the same in size or shape. 
Although it looks easy enough but when you actually put the components together to form the pendant you will find that it can make you want to pull your hair out!
However because I really like the uniqueness of this pendant form that made me decided to make it into a tutorial and share it with others.
Having said the truth about this, 
I hope you will give this tutorial a try and adopt the technique and be adventurous with the bead choice J

Level: Intermediate to Advance

This tutorial will be on offer at

HANDMADE.MY

at a special price of RM10!


Materials:

· 18gauge dead soft copper wire 36inches
·  24gauge dead soft copper wire 6 inches
·  6mm Turquoise bead 1 piece
·  Copper jump rings 2 pieces

Tools:

· Chain nose pliers
· Round nose pliers
· Wire cutters
· Flat nose pliers
· Ruler
· Wire filer
Chasing hammer and metal block

Steps:28
Pages: 15
File Size: 1.4mb

Design  copyright 2011 by Rimaumanja of whimsicalnquirky.com.my

COPPER AMORA EARRINGS TUTORIAL


design and craft by RIMAUMANJA
www.whimsicalnquirky.com.my

This tutorial is now available.

Price: RM20 
(PDF file)

Price: RM30 
(printed copy, inclusive of shipping and handling)

For rest of world, 
Paypal price: USD6

NOW AVAILABLE AT JEWELRYLESSONS.COM !!

This lesson shows you how to make this simple and fun to make component. The component can be made into pendants, earrings and even bracelets.


 If you face problems with this tutorial, please contact me ASAP via email to whimsicalnquirky@gmail.com and I will try my very best to assist you. 

Level: Intermediate

Materials:


· 18gauge dead soft copper wire 4inches x 2 pieces
·  24gauge dead soft copper wire 60inches x 2 pieces
·  4mm copper bead balls 40 pieces
·  Copper jump rings 6 pieces
·  Copper ear hooks 1 pair

Tools:

· Chain nose pliers
· Round nose pliers
· Wire cutters
· Flat nose pliers
· Ring mandrel or anything similar
· Ruler
· Wire filer

Number of steps: 25
Number of pages: 16
PDF file size: 1.2MB

I hope you enjoyed this tutorial. 
If you need to ask questions and  need further help with the handmade jewelry making tutorial, please email me at:

Please do not distribute, lend, copy or mass produce this handmade jewelry making tutorial for re-sale or for jewelry making workshops other than author’s own. 
Please respect all intellectual property of whimsicalnquirky handmade jewelry.

However you can use this jewelry making tutorial to produce finished products for your own pleasure or for individual sale.

You are encourage to apply the techniques learned from this jewelry making tutorial to come up with your own creative works .

Copyrights 2011 @Rimaumanja,whimsicalnquirky.com.my


YOUNG VICTORIA EARRINGS TUTORIAL


This tutorial is now available.
Price: RM20 
(PDF file)

Price: RM30 
(printed copy, inclusive of shipping and handling)

For rest of world, 
Paypal price: USD6

NOW AVAILABLE AT JEWELRYLESSONS.COM !!


Tutorial: Victoria Earrings
Created by Rimaumanja


Level: intermediate

This tutorial shows you how to encase a crystal rivoli button with wire wrapping netting technique. Different artists have different ideas and methods to do this. This is how I usually do it with my crystal buttons or cabochons.

INSPIRATION:

I was really inspired to craft this pair of earrings after I saw the movie YOUNG VICTORIA. I love vintage look and the jewelry in that movie and in all other historical movies are just exceptionally interesting.

This is one pair of earrings that will not go out of style. Looks intricate and dainty and suitable for any age and make them feel like a princess. Every girl would love this pair especially when it is made with love and a gift from someone! J

PLEASE read thru the tutorial over before crafting out the project.

Materials:
· 8 inches of 20gauge dead soft copper wire
· 72 inches of 26gauge dead soft copper wire
· 2 pieces of 12mm swarovski rivoli buttons

Tools:

· Chain nose pliers
· Round nose pliers
· Wire cutters
· Flat nose pliers
· Wire filer
· Ruler
· Marker pen

Ring mandrel or anything similar


Number of steps: 23
Number of pages: 17
PDF file size: 1.6MB


I hope you enjoyed this tutorial. 
If you need to ask questions and  need further help with the handmade jewelry making tutorial, please email me at:

Please do not distribute, lend, copy or mass produce this handmade jewelry making tutorial for re-sale or for jewelry making workshops other than author’s own. 
Please respect all intellectual property of whimsicalnquirky handmade jewelry.

However you can use this jewelry making tutorial to produce finished products for your own pleasure or for individual sale.

You are encourage to apply the techniques learned from this jewelry making tutorial to come up with your own creative works .

Copyrights 2011 @Rimaumanja,whimsicalnquirky.com.my 

ROMANTIC GARDEN PENDANT TUTORIAL

ROMANTIC GARDEN PENDANT TUTORIAL  


Tutorial: ROMANTIC GARDEN PENDANT TUTORIAL


design and craft by RIMAUMANJA
www.whimsicalnquirky.com.my


This tutorial is now available.

Price: RM20 
(PDF file)

Price: RM30 
(printed copy, inclusive of shipping and handling)

For rest of world, 
Paypal price: USD8

NOW AVAILABLE AT JEWELRYLESSONS.COM !!


This lesson shows you how to make this simple and fun to make component. The component can be made into pendants, earrings and even bracelets.

Inspiration:
The design was much inspired by another wire jewelry artist, Mary Tucker. 
While I was trying to make the little trinket pots, Some pots did materialize but I always end up just making the lids! That is how this pendant came about.


A note of Thank You, 
to Emi Kaz for helping me to fine tune this design :)

If you are familiar with techniques like coiling, spirals, wrapped loops and wire weaving with beads then you will have a fun time crafting this component out.

 If you face problems with this tutorial, please contact me ASAP via email to whimsicalnquirky@gmail.com and I will try my very best to assist you. 

MATERIALS:
18gauge dead soft wire
26gauge dead soft wire
4mm round beads
copper chain

Tools:

· Chain nose pliers
· Round nose pliers
· Wire cutters
· Flat nose pliers
· Wire filer
. Marker
· Pen
.Ruler

Number of steps: 29
Number of pages: 30
PDF file size: 1.7MB

I hope you enjoyed this tutorial. 
If you need to ask questions and  need further help with the handmade jewelry making tutorial, please email me at:

Please do not distribute, lend, copy or mass produce this handmade jewelry making tutorial for re-sale or for jewelry making workshops other than author’s own. 
Please respect all intellectual property of whimsicalnquirky handmade jewelry.

However you can use this jewelry making tutorial to produce finished products for your own pleasure or for individual sale.

You are encourage to apply the techniques learned from this jewelry making tutorial to come up with your own creative works .

Copyrights 2010 @Rimaumanja,whimsicalnquirky.com.my

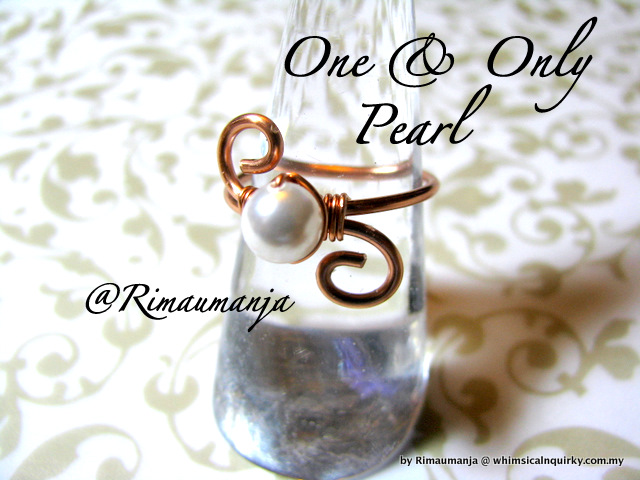
The making of - ONE & ONLY RING TUTORIAL


This is a very simple and yet lovely ring to wear. All you need is some wires ( not much), scraps are perfect and one single round 6mm bead. If you prefel larger size bead...you will probably need to use different wire gauges to suit that bead.

Materials i used for this free tutorial,
6mm swarovski pearl
16 gauge wire
24 gauge wire

Tools,
ring mandrel
cutter pliers
round nose pliers
flat nose pliers
chain nose pliers
ruler
wire filer

*******************************************

Begin directly from the spool. 
Measure and cut the desired ring size.
Leave about an inch on each end from the point where wires meet at the centre.


cut wire away from spool.
File sharp wire ends with wire filer.


If you have 24gauge wire scraps from past projects,this is the time to use them.
You will need about 6-7 inches in length.


make 5 wraps around ring frame as in picture.


thread in one pearl bead.


position pearl across ring on overlapping point.


wrap wire tail around ring frame as in picture.


Then wrap wire tail around pearl.


Repeat wrapping wire tail around pearl bead.
On the 3rd or 4th wrap, wire tail position is at the back.


Then wrap that wire tail around ring frame 4 or 5 times, your preference.


Cut any excess wire.


Final step is to curve in both wire ends of ring frame.


DONE!


I hope you enjoyed this free tutorial.
If you need to ask questions and  need further help with the handmade jewelry making tutorial, please email me at:

If you enjoy making this ring, DO share this FREE tutorial and link it back to this blog.

you can use this jewelry making tutorial to produce finished products for your own pleasure or for individual sale.

You are encourage to apply the techniques learned from this jewellery making tutorial to come up with your own creative works .

Please respect all intellectual property of WHIMSICALNQUIRKY handmade jewellery. PLEASE do not remove, amend or photoshop anything and use it for your personal gain while not giving credit to the author of this tutorial.
All cooperation is much appreciated.


Copyrights 2010 @Rimaumanja,whimsicalnquirky.com.my